

Hello and welcome to the next article in my series on backing up your data. Today I am going to look at two software/hardware hybrid solutions. The first one is slightly complicated but does not require much knowledge other than what I present here. The other is fairly complicated from a hardware perspective.
The first method is built into Windows and is called System Restore. Some of its features work automatically in the background. An example of this is whenever you install a new piece of software Windows creates what is called a Restore Point. This restore point allows you to easily turn back time to a time before you installed the software; you may need to do this if the software won’t work and you can’t uninstall it. While Windows does this automatically, you can also set a restore point at anytime if you like. You can also give it a recognisable name such as “Microsoft Office Restore Point” if you are about to install Microsoft Office and want to be able to easily remove it later if something goes wrong. Follow the steps below to learn how to create a manual System Restore.
- First, type “system restore” into the search bar at the bottom of your screen, it is located beside the Windows Start button.
- In the list that appears click on “Create a restore point”.
- A box should now appear. First, make sure the “C:” has its Protection set to on under “Protection Settings”. If yes go to step 5.
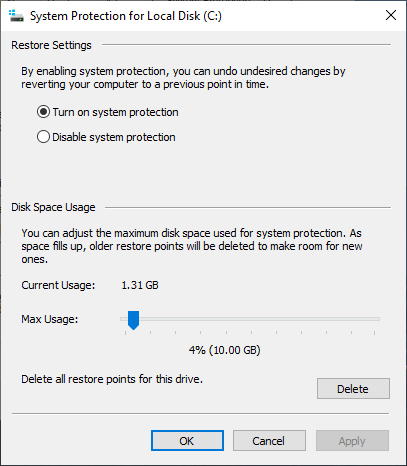
- If no, click on the C: drive and then click on “Configure…”. Another box will open allowing you to turn system protection on or off. Select “Turn on system protection”, and press apply, then “OK”.
- To create the restore point click on “Create”, give the restore point a name and click “Create” again. After a few seconds/minutes the restore point will be created.
Should the worst happen and you need to use your newly created restore point follow the steps below:
- Complete steps 1 & 2 above.
- Click on “System Restore”.
- You can now choose to take Windows’ suggestion and use its recommended restore point, or you can choose a different one by selecting “Choose a different restore point” and clicking “Next”.
- You should now get a list of restore points including the one you created earlier. Click it and press “Next”.
- When you are ready click “Finish” in the box that appears and your computer will restart to restore your system (If you are just doing this as a tutorial click cancel to avoid any unnecessary issues).


As with all the advice I give in this blog if you need help with this you can contact me using the information found here.
Now for the more technically complex method of backing up your data, I will try to make this as simple as I can. RAID (Redundant Array of Independent Disks) involves taking a number of similar hard drives, either mechanical or SSDs (see my article on upgrades for more info) and using software to essentially join them into one super hard drive. The function of this hard drive differs depending on the type of RAID system you are using, to keep it simple (sort of) I am discussing RAID 1 and RAID 10. The first one involves taking 2 hard drives and using them to mirror each other so if one hard drive fails or becomes corrupted the other can take over, however to continue using the system you will have to replace the bad one. The downside to this is that it slows down you computer especially if you are using mechanical ones (they are cheaper and very appealing for RAID systems using many hard drives) as each piece of data has to be copied between the two drives, e.g. If I download a photo it is stored on drive one, it is then copied to drive two.
RAID 10, counters the issues with RAID 1 but uses double the number of hard drives. This is because it uses what is called striping to speed up the process. The issue with this on its own is that if one hard drive fails the whole system fails, however by adding an equal number of hard drives you can backup each drive so if one of the striped drives fails you can replace it with its corresponding backup, in turn saving the system.
RAID in general tends to be used more by enthusiasts, businesses, and those with cash to burn as it can become expensive to maintain a RAID system if several drives go at once especially if you are using SSDs. The system also requires a large desktop computer case to fit all the hard drives or a special external docking bay. Naturally it also requires plenty of maintenance and a proactive approach to replacing hard drives at the first sign of trouble. This can require a bit of technical know-how and is not for the faint of heart. While this particular system is probably not going to be used by most of you reading this I decided to include it to give you an insight into the varying degrees of knowledge that computer technicians are expected to know and more importantly the procedures they are expected to be able to perform for you the customer. However, if you are interested in setting up a RAID system you could set up an appointment with Tech Advice for a lesson on setting it up and maintaining it along with some buying advice for the hard drives.
Thank you for reading, next time I am going to look at some smartphone/tablet specific ways of backing up (I have mentioned some already in previous articles). As always, if you have any questions, or suggestions you can email help@techadvice.ie, or post them in the comments here or on Facebook.
