

Hello and welcome to another Tech Advice blog article. Today’s article is for smartphone and tablet users, and I am going to explain what a QR code is, how to use them, and at the end I will show you to create your own.
What is a QR Code:
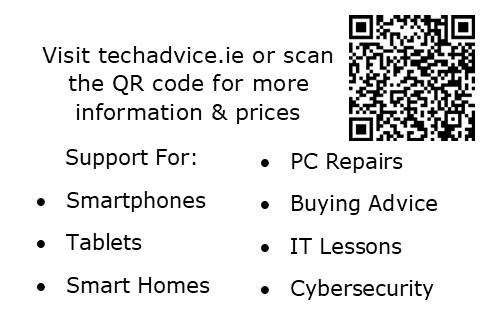
So, let’s start with what a QR code is. QR stands for Quick Response code, they are like barcodes used in shops, except they can store information readable by a smartphone/tablet camera. They are commonly used by businesses to link to their websites or a specific page on their website. This is done by creating a QR code and simply placing it like a photo into their marketing materials such as posters, signs, and even on business cards. Except for signs, Tech Advice uses them this way to allow potential customers to view our website quickly without having to type the full web address.
How to use a QR Code:
To use a QR code you need either a smartphone or a tablet (this tutorial is for Android devices only, sorry Apple/iOS users). Just a quick note that every device is different so some of my instructions may not work in some cases. In addition to the device, you will need to be connected to the internet to access the QR code.
- Find a QR code. Tech Advice has a poster entering the shop or business cards at the post office (Both in Inistioge) if you need to find one.
- Make sure you have a Wi-Fi or Mobile Data connection.
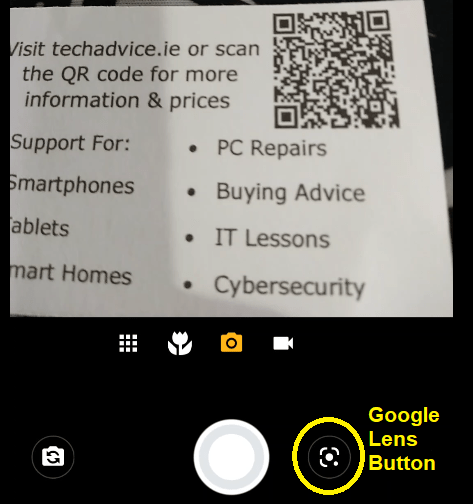
- Open the camera app on the device.
- Alternatively, you can use the Google Lens app, if it is installed it will be opened by the camera app anyway in the next step.
- To the right of the shutter button (the big button used to take pictures) is a little symbol that looks like a square with a dot in the middle with one corner being replaced by a dot. Press this button.
- This will open Google Lens. Position your camera to align the corners of the box with the QR code.
- Depending on your internet connection, you may already see some information such as techadvice.ie if using one of our codes. If this does not happen tap the search button and Google will search for the QR code.
- To access the website, tap the name and it will open. Just make sure the QR code is from a reputable source and not just lying around with no context.
How to Create a QR Code:
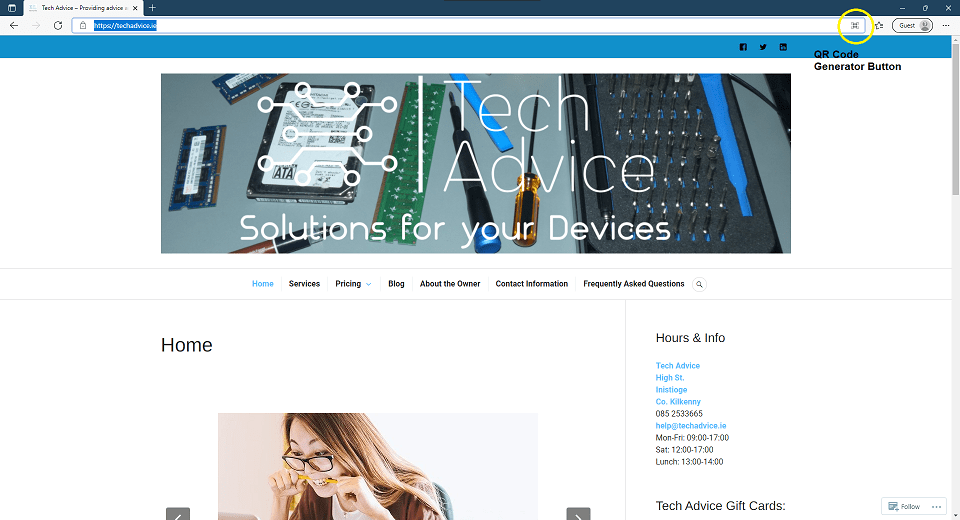
Many internet browsers are now able to generate QR codes for the webpage that you are on. For this tutorial I will be making one using the Tech Advice website and Microsoft Edge; in my experience it is almost identical with any other popular browser, let me know if it isn’t as I may have missed one.
- Open Microsoft Edge.
- Navigate to techadvice.ie.
- To the right of the web address bar, you should see a symbol with four squares and a box around them, this is the QR code generator.
- Press this. You will now see a QR code that links to the website, you can scan it with your phone now if you want to test it.
- If you want to put it in an email, on a poster, or an other place, press the download button and an image version of the QR code will be saved to your computer.
I would suggest that you create QR codes this way as there are many sites out there claiming to do this, some request payment, others may not be reputable, so take no chances and use an internet browser.
Conclusion:
I hope this article has helped you understand what QR codes are and possibly even shown how useful they can be with so many of us owning smartphones. Just be careful what you are scanning and where, as they are a little too easy to create and the last thing you want is to scan a code linked to a dodgy website, so be careful.
Thanks for reading this article, and as always, feel free to post any suggestions for future articles either here or on Facebook.
